
The Shape of Things
 All Classroom Lessons
A Lesson for Kindergarten, First, and Second Grade

A Lesson for Kindergartners
By Marilyn Burns
Dayle Ann Dodds wrote that she developed the idea for her book The Shape of Things (Candlewick, 1994) to help children see “how a few simple shapes make up a lot of things we have in the world.” After reading the book to a kindergarten class, Leyani von Rotz organized three activities to give the students further experience with identifying and naming shapes. This lesson appears in the new book Math and Literature, Grades K–1, by Marilyn Burns and Stephanie Sheffield (Math Solutions Publications, 2004).
Leyani showed the kindergartners the cover of The Shape of Things and asked, “What do you see on the cover?”
“I see a sun,” Gamila said.
“I see a boy and two girls,” Tamera added.
“I see a house shape and a sun shape,” Mansur said.
Leyani opened the book and showed the first two-page spread. The left-hand page shows a large yellow square with a rhyme underneath it describing how squares can be found in a house’s roof, windows, and door.
After reading the text, Leyani focused the children on the right-hand page. Pictured on this page is the yellow square transformed into a house, as shown on the book’s cover. The house has two windows that are also squares, a red door, a roof, and two chimneys. Leyani said, “So here you see the yellow square changed into a house. What else could you make with a square?” Several of the children suggested things that they saw in the illustration, such as a window and a roof.
Before going on to the next page, Leyani pointed out the pattern in the top and bottom borders of alternating larger green squares and smaller yellow squares. “Let’s look at the pattern,” Leyani said. Pointing to the squares across the top, Leyani said, “Yellow square, green square, yellow square, green square, . . . .” The children joined in as Leyani followed the pattern across the two pages. Leyani did this again, this time focusing on the sizes of the squares: “Little square, big square, little square, . . . .” Again, the children chimed in.
Leyani turned the page and showed the next spread. The left-hand page shows a blue circle, and the right-hand page shows a nighttime amusement park scene with the blue circle made into a Ferris wheel. Before discussing the page with the class, Leyani asked the children to talk with their partners about the picture on the right-hand page. She said, “Talk about what you notice on the page, and then talk about what else you think you could make with a circle.” After a minute or so, Leyani asked the children for their attention and she asked, “Who would like to share what you talked about with your partner?”
Queenie said, “I talked about when I went on the roller coaster faster and faster.”
“There’s a mommy and a girl,” Tamera added.
“And what else could you make with a circle?” Leyani asked. “A clock,” Danny said.
“A ball,” Bayard added.
After the children had shared, and before turning to the next page, Leyani focused on the border pattern. This time the pattern showed alternating circles, a larger red circle and a smaller blue one. Again, Leyani described the pattern twice, once focusing on the circles’ colors (red circle, blue circle, red circle, and so on) and then focusing on their sizes (big circle, small circle, big circle, and so on).
The next spread shows a red triangle on the left-hand page; on the right-hand page, the red triangle turns into a boat with a green triangle for its sail. Leyani asked, “What do you notice? What else could you make with a triangle?” She first gave the children the chance to talk with their partners and then led a discussion. Finally, they looked at the border pattern.
Leyani continued in this way for the remainder of the book. After finishing the book, Leyani focused the children on looking around the room for different shapes. To begin, she instructed, “Find a rectangle in the room and point to it.” Then she asked the children to describe what they had found.
“A picture,” Danny said, pointing to the watercolors with construction-paper backings pinned on the wall.
“The calendar,” Daria said, pointing to the calendar.
“The doors,” Queenie said, pointing to the cupboard doors.
After doing the same for other shapes, Leyani introduced three different activities set up at three different locations in the room. On one table, she placed a set of blocks with shapes similar to the shapes in the book—several sizes of squares, rectangles, triangles, and diamonds (parallelograms). She also set out blank paper, one sheet at each place available, for children to work on. “When you go to this table,” Leyani explained, “you put blocks on your paper to make a picture. When I come to see you at work, I’ll ask you to tell me what you’ve made. After you make a picture, you can put the blocks back in the pile and make another.”
Leyani placed The Shape of Things on another table. “When you come here,” she explained, “one person opens the book to a page and tells what the shape is. Then all of you look around the room for examples of where you see that same shape.”
Leyani then described the third activity. “On this table,” she said, “there are lots of cutout paper shapes.” Leyani had cut triangles, rectangles, circles, and squares from construction paper, each about the same size as the shapes shown on the left-hand pages in the book. “You pick one shape, paste it on your paper, and then make a picture out of it. You can use the ideas you saw in the book or your own ideas.”
Leyani organized the children into three groups and had them rotate to the three activities, spending about ten minutes at each. Leyani circulated and talked with the children about what they were doing.
At the table with the blocks, Deandra said, “I made a sun and a lollipop.” Danny said, “This is a house.”
At the table with the paper shapes, Fawziya used a triangle as the roof on a house, Rico pasted down a square for a house and drew a triangular roof on it, and Mallika used a rectangle for a house. (See Figures 1 and 2.) Mansur chose a triangle and made a fish.
Eduardo used a circle to make a car and Gamila drew a picture of herself using a circle for her head. To follow up the experience, Leyani gathered the children again. “I’m going to show all of the pictures you did, but I’m not going to hold them up the right way. I’ll either hold them upside down or sideways. I’ll flip through your pictures quickly, and for each one, tell me what shape you see. I don’t want to hear ‘house’ or ‘boy’ or ‘girl.’ Instead, I want to hear ‘square,’ ‘triangle,’ ‘circle,’ or ‘rectangle.’” Showing the pictures in different positions helps children identify shapes even when the shapes are oriented differently than they are typically presented.
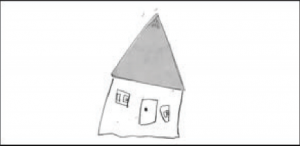
Figure 1. Fawziya used a triangle to show a roof on her house.
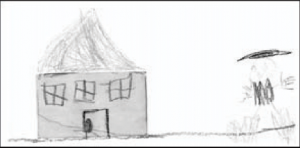
Figure 2. Mallika pasted down a rectangle for a house and drew a triangle
on top for the roof.
From Online Newsletter Issue Number 15, Fall 2004
Comments