
 All Blog Posts
Each year our middle school celebrates the circle and its mathematical relationships on “Pi Day,” March 14, using the date of 3/14 to honor the 3.14 approximation of pi. A local bakery donates pies and, in every math class, students measure round things and consume their pieces of pie. Amidst the Pi Day activities, students are introduced to the vocabulary of circles—center, diameter, radius, circumference, arc, chord, tangent, and pi. These terms mean more to students when they are introduced to them in a real-life (and delicious) context.
I began class with a question that sounded simple enough: “Who thinks they can draw a perfect circle on the board?” Hands shot in the air as almost everyone accepted the challenge. I paused and went on, “You have to draw the circle freehand, without any tools or help.” I paused again and then added, “And you have just one try. You have to draw a perfect circle on the board on your first try.” Finally, I added one more requirement: “The diameter of the circle must be greater than the span of your hand from wrist to fingertip.” Asking students to compare the circle’s diameter to their hand span brought thoughtful looks to many faces.
“I don’t get it,” said Linda. “What do you mean?”
“Who can explain the size requirement?” I asked. Rather than explain myself, I was interested in giving others the chance to clarify their thinking. Also, when a student explains, the others have the opportunity to compare their ideas with a classmate’s understanding of the situation.
Kaita held up his hand with his fingers stretching wide from the palm. “The circle has to be bigger around than this.” He traced a circle in the air with this left index finger around his outstretched right hand. “Otherwise, you could just draw a tiny circle, like a pencil dot.” Linda nodded, indicating that she now understood.
“Let’s give Kaita, Sami, and Rayleen a chance to each draw a circle,” I said, calling on three volunteers. As the students approached the board from their small groups, I explained the procedure. I marked three dots on the board, saying as I did so, “I’ll put three circle center points on the board. Each student will try to draw his or her best circle around the center.” Kaita, Sami, and Rayleen each drew their circles around the points that I had spaced along the front board. Then they stood back so the others could see what they had drawn.
We all looked at the circles and verified in our minds’ eyes that they were large enough to encircle each person’s open hand. I then asked, “Who can think of a way to check whose circle is the most round?”
The task of evaluating the circles had the students wondering, and they looked to their classmates to see if anyone had an idea. I waited for their ideas to emerge but didn’t rush their thinking by calling on any of the few students who had a hand up. Instead, I said to the class, “Check your ideas with your group and together design a way for us to evaluate the circles.” The three volunteers returned to their groups and joined eagerly in the discussions.
All eight groups in the class appeared to forget about the three circles on the board. They sketched circles on notebook paper and tried out their ideas. They listened to each other and refined the most promising ideas. The discussions were active and animated.
Soon, I brought the class back to attention and called on Andre to offer his group’s idea. He said, “You can measure the distance from the center out to the circumference of each circle, but you’d have to do that all around the circle.” I asked him to explain further. “You couldn’t just measure once. You’d have to measure four times at least, top and bottom and left and right.”
Kristi, another member of his group, added, “The more measures you make, the better we can tell which is the best circle. The one that has all the measurements across the circle almost the same is the best circle.”
I wanted to reinforce accurate terminology along with their mathematical thinking, so I asked, “What part of the circle are you measuring?”
Andre responded, “If the diameters are all equal measurements, then it has to be round. You are measuring the radius, and two of them make a diameter. You could use a ruler or you could use a string. It wouldn’t have to be that exact.”
“Did any group have a different idea?” I asked. “Let’s hear all ideas and then test them.”
Next Stewart spoke for his group. “Put a line down the middle of the circle and you can fold the circle over. If it matches side to side, then it’s a perfect circle. We figured that you’d have to trace the circle onto a piece of paper first and then fold it, so maybe our method isn’t as good as Andre’s group’s, but it would work and you’d see it faster than measuring the diameters.”
I was pleased at these two very different ideas and commented, “I appreciate hearing different approaches to solving the problem. Stewart and his group offered a geometric solution, using a line of symmetry and reflection, while Andre’s group suggested measuring and examining the numbers they collected.”
Kaita, one of the students who had drawn a circle on the board, gave another idea. “You can just trace around something that’s circular and a little bigger or smaller than the circle I drew.” He looked around and found the lid from a circular oatmeal box that was holding a class supply of rulers. Kaita’s group quickly got his attention and whispered to him. Kaita then said, “My group thinks that we should trace around a circle that’s bigger and one that’s smaller with the circle I drew in between them. That way we can see how round it is compared to two different circles.”
No other group had a different method to suggest. With these three methods to consider, I asked groups to talk over which one they thought was reliable, practical, and would produce the most accurate way of deciding. After the groups had time to evaluate the three approaches, I called them to attention and said, “By a show of hands, let’s take a survey of the method you like best. Is it measuring several diameters, using a line of symmetry and reflectional symmetry, or tracing similar circles?”
I paused after each choice for students to raise their hands. All methods received some show of hands, but most of the support was for the last method. Kaita came to the board with the circular box top, which was smaller than the circle he drew. He carefully centered it in his circle and traced around it. He did this for the other two circles on the board and then stood back and looked them over. He turned to the class. “I think it’s pretty clear which one is best. It’s easy to tell with the circle in the center that Rayleen’s is the best circle. We don’t really need to trace a bigger circle.” Sami agreed, and the class recognized Rayleen’s success with a round of applause.
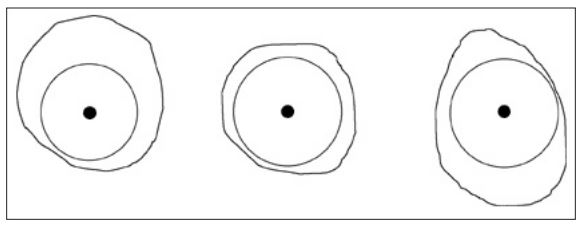
Fig 1. Using a cylinder, Kaita traced a circle in the center of his, Rayleen’s, and Sami’s circles.
Clearly, everyone was engaged by the idea of drawing a freehand circle. After only a few minutes of brainstorming, three important mathematical ideas about circles were brought out: a circle is defined by a set of points that are equidistant from the center point; circles have reflectional symmetry with infinite lines of symmetry; similar shapes have the same properties but are different sizes. All three of these ideas are crucial for students’ understanding of circle formulas.
Trying this lesson in your classroom? Share your students’ thoughts with us in the comments!
Comments